One of the big advantages of a digital marketing strategy is the opportunity it gives you to collect data. But until recently, doing this has often required access to specialized technical knowledge.
Tools like Google Analytics can provide you with a lot of information but have their limitations if used by themselves. Google Tag Manager makes it easy for businesses of any size to collect data from their website while greatly reducing the need for technical support. Below, we’ll take a look at what Google Tag Manager does, and how you can get started using it.
- What are Tags?
- How Google Tag Manager works
- Why you should use Google Tag Manager
- How to install Google Tag Manager
- Four ways to get the most out of Google Tag Manager
1. What are tags?
Before we start talking about Google Tag Manager, you first need to understand what a tag is.
A tag is a small piece of html or javascript code, often called a code snippet or script, that is added to your website, and which lets you collect information. You can use tags to perform a large range of different tasks like tracking how people arrive on your website or to monitor specific actions like form submissions and file downloads. A common example is to collect analytics data in conjunction with a tool like Google Analytics.
Each tag tracks one specific action, so typically you require a number of them on your website. This normally involves adding a significant amount of code to your website, which can be both time-consuming and obviously difficult if you don’t have much coding experience.
2. How Google Tag Manager works
Google Tag Manager (GTM) is a free tag management system for your website that greatly simplifies the task of working with tags. It lets you create and monitor tags using a user-friendly interface without having to manually modify the code of your website (or ask a developer to do so) each time you want to add a new tag.
Tags for a lot of different digital marketing tools, like the Google Analytics tag or the LinkedIn Insight tag, for example, can easily be installed directly in Google Tag Manager:
3. What is a Google Tag Manager Browser
To work with Google Tag Manager, you also need to understand what a trigger is. Each tag on your website should serve a particular purpose. A trigger is the event or condition that a tag is designed to record. Every tag needs to have a trigger otherwise it won’t actually do anything.
Google Tag Manager lets you easily choose from a range of different triggers for your tags. A typical trigger is “Page view”, which triggers a tag to be recorded when someone views a webpage.
But triggers can also be set for clicks or engagement with a particular part of a webpage. For example, you can use them to launch a chatbot only on product pages or to record a LinkedIn conversion tracking code only on Thank You pages.
They are also particularly useful for segmenting a multilingual website by language.
2.2 Google Tag Manager in practice
On a real B2B website, Google Tag Manager works something like this:
- You embed the Google Tag Manager code once for each page of your website.
- When you want to add a new tag to your website (e.g. for Google Analytics, Plezi, Facebook), Google Tag Manager will automatically create the code for this and add it to your website.
- You no longer need a developer to manually modify the code of your website or know how to do this yourself.
- You can run a paid advertising campaign and be sure that the conversion tracking tag is installed correctly, letting you easily track results.
- You can test a digital marketing tool like Plezi and be sure that you are getting the right data.
Once you learn more about how Google Tag Manager works, you can use it to do a lot of other things. Here are just a few examples:
- See what percentage of a video has been viewed.
- See how much of a blog post has been read.
- Track any action on your website and set it as a “conversion goal” in any tool
- Personalize the elements of a web page based on each visitor
- Enable cookies using a GDPR acceptance banner of your own design
3. Why should you use Google Tag Manager?
While it certainly doesn’t hurt that Google Tag Manager is free, the main advantage of using it is that it lets marketers add, delete, or modify tags for any tool on your website without being reliant on web developers to do this.
And because Google Tag Manager is the most widely used tag management system available, most of the tools that you will want to add tags for will have tutorials available on how to do this, like our own at Plezi. That’s obviously great news for small businesses that might have limited in-house technical support.
As an example, a marketer who wants to increase their paid acquisition channels and track conversion rates (i.e. to see if they really generate leads), will soon need to add the following tags to their website:
- Google Analytics or another analytics tool
- Plezi, or other marketing automation software
- the Facebook pixel
- a LinkedIn Insight tag
- an AdRoll tag
- a Google Ads conversion tracking tag
- Google Ads remarketing tag
- etc.
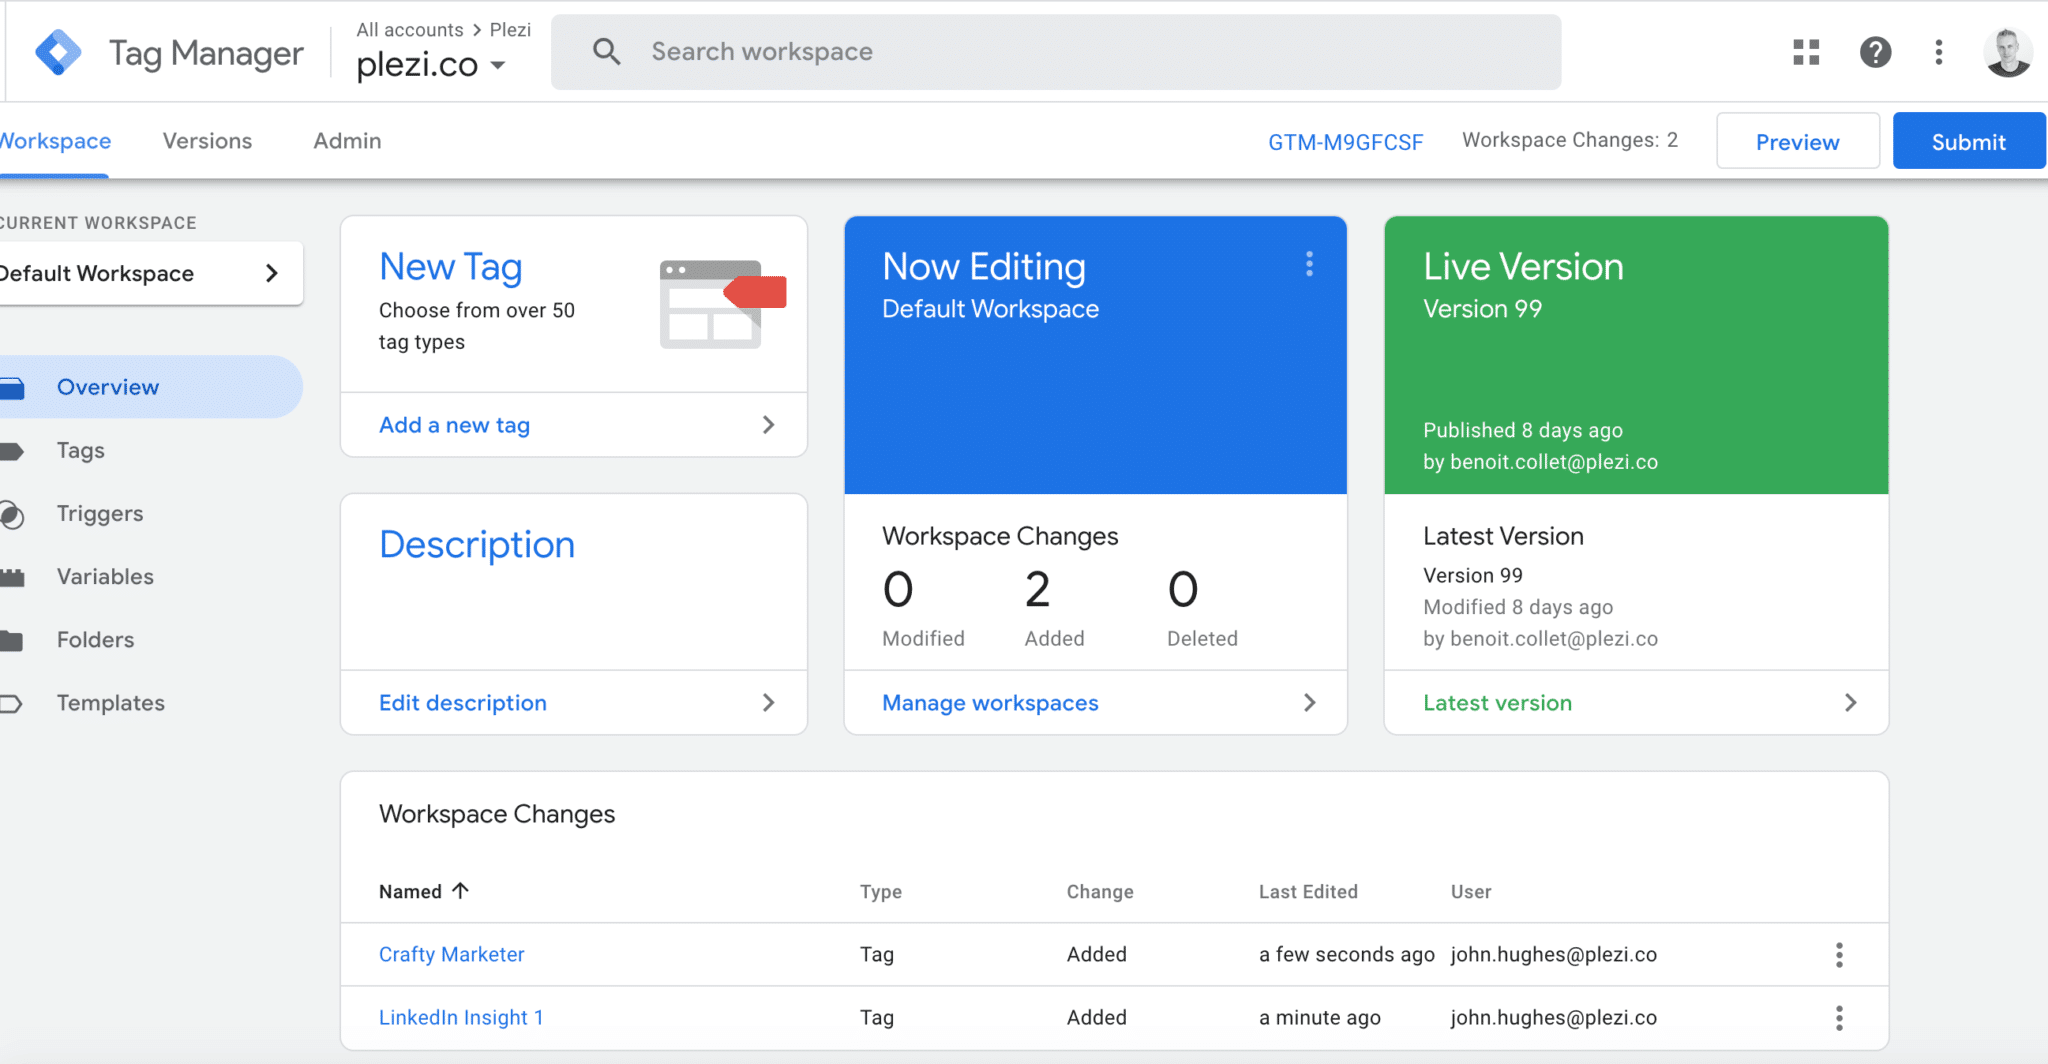
Using Google Tag Manager, you can easily add all these tags and test them before you make them live on your website:
If you make a mistake, Google Tag Manager makes it easy to retrace your steps. That helps take the stress out of adding tags to your website when you don’t have much coding experience.
A typical problem with normal tag scripts is that they can slow down your page load speed if they’re poorly installed or if they are triggered synchronously. What this means is that if one tag is slow to load, it causes other tags on your website to wait while it does so. This can slow down your website or even stop a webpage from displaying correctly.
We encountered this very problem at Plezi with our old chat tool.
Google Tag Manager helps you avoid this problem:
- it allows you to carefully select where you add the script
- it ensures all scripts start asynchronously by default. This means they never prevent content from being displayed, even if there’s a bug
- it lets you prioritize the order of loading scripts
4.How to install Google Tag Manager
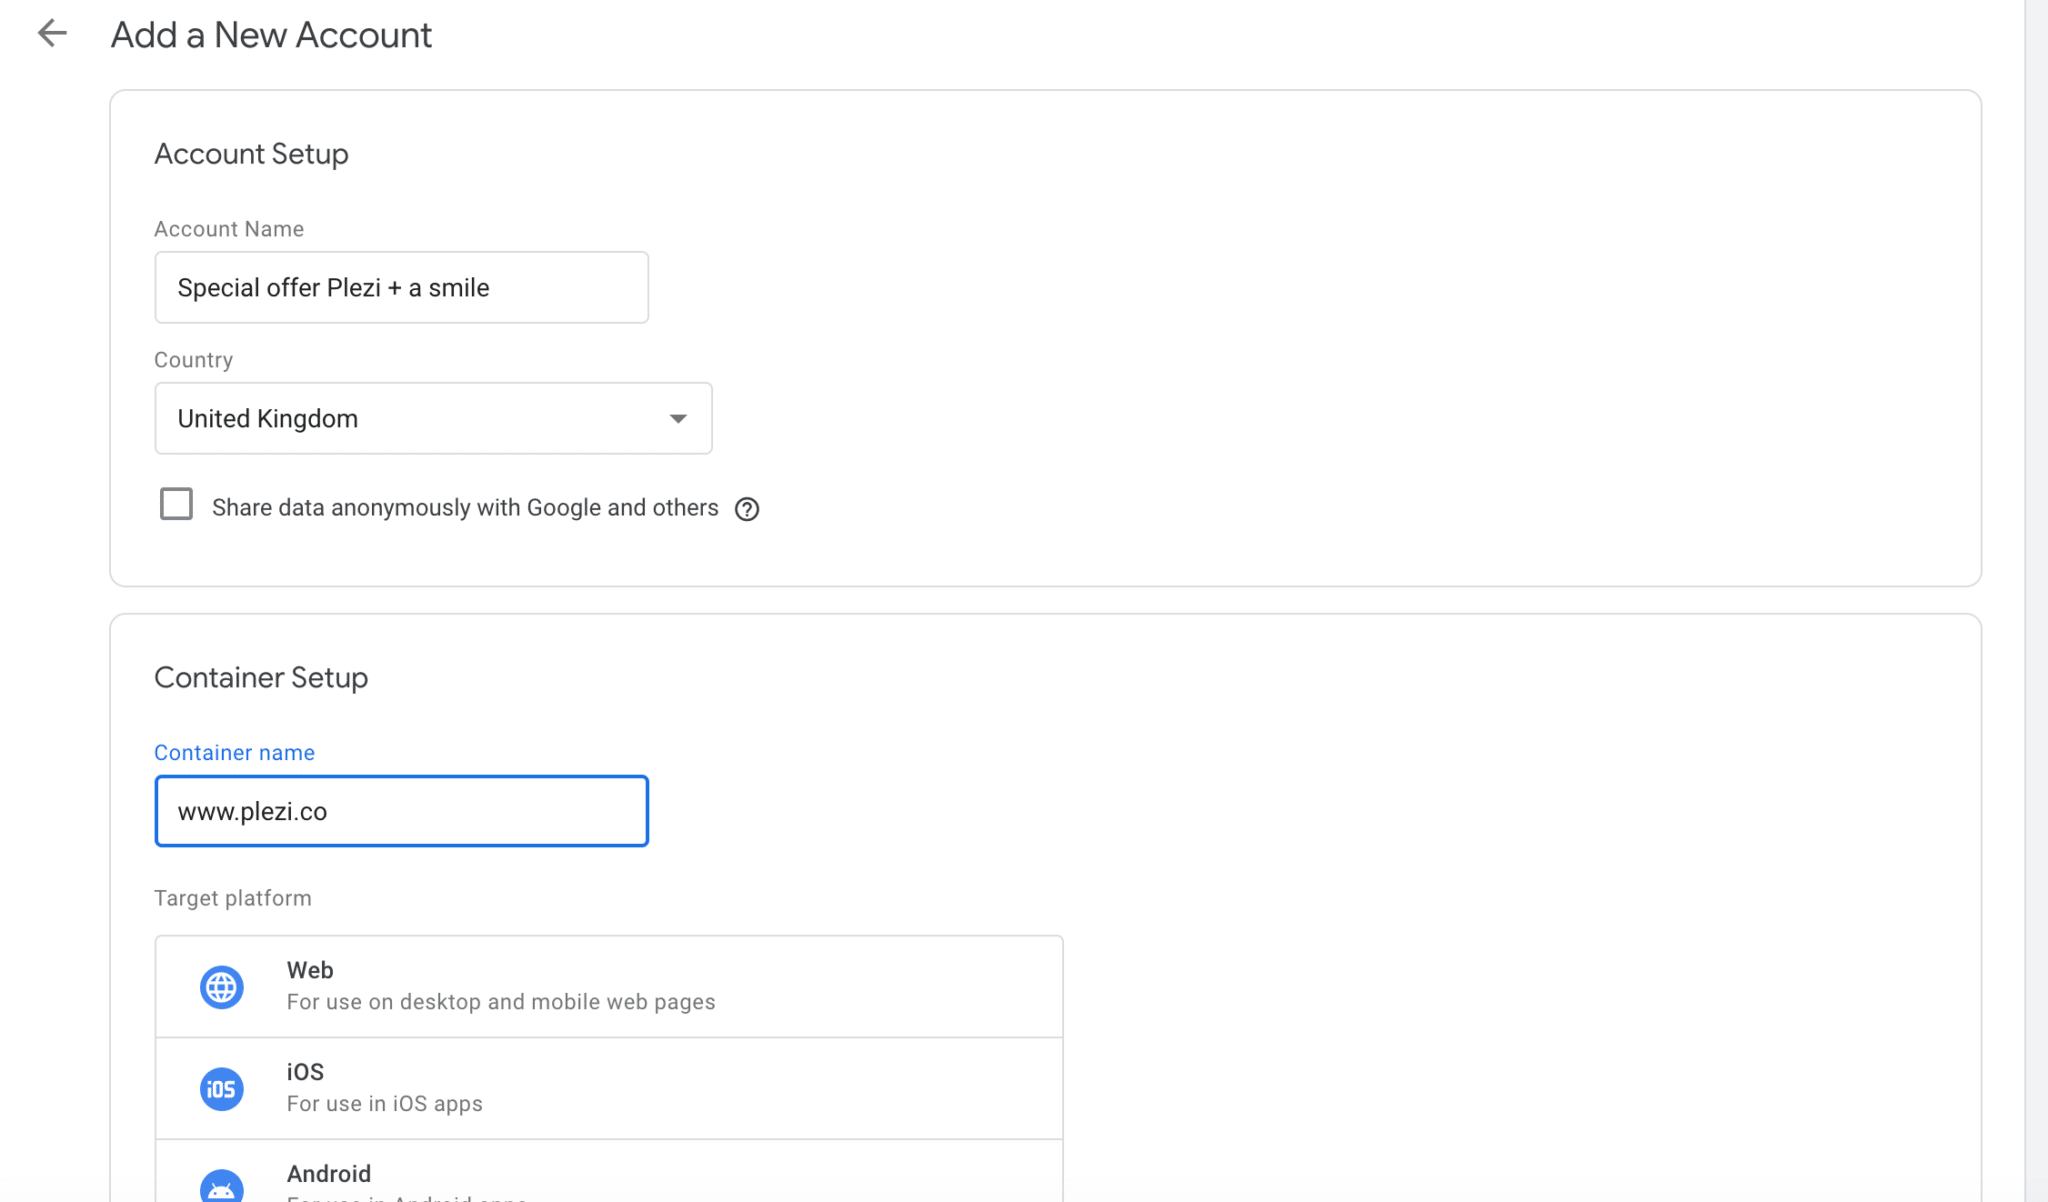
Here’s how to create a Google Tag Manager account and a container for a website:
Note, there is an account linked to your email address, and accounts corresponding to your website or websites.
- Under Setup Account”, give your account a name (typically the name of your company) and choose your country
- Choose not to share your data with Google
- Click “Continue”
- Under “Setup Container”, enter your domain name as the container name
- Select the type of container (here we’ll look at a web container)
The container in Google Tag Manager is where you will put all of the tags that you want to use on your website.
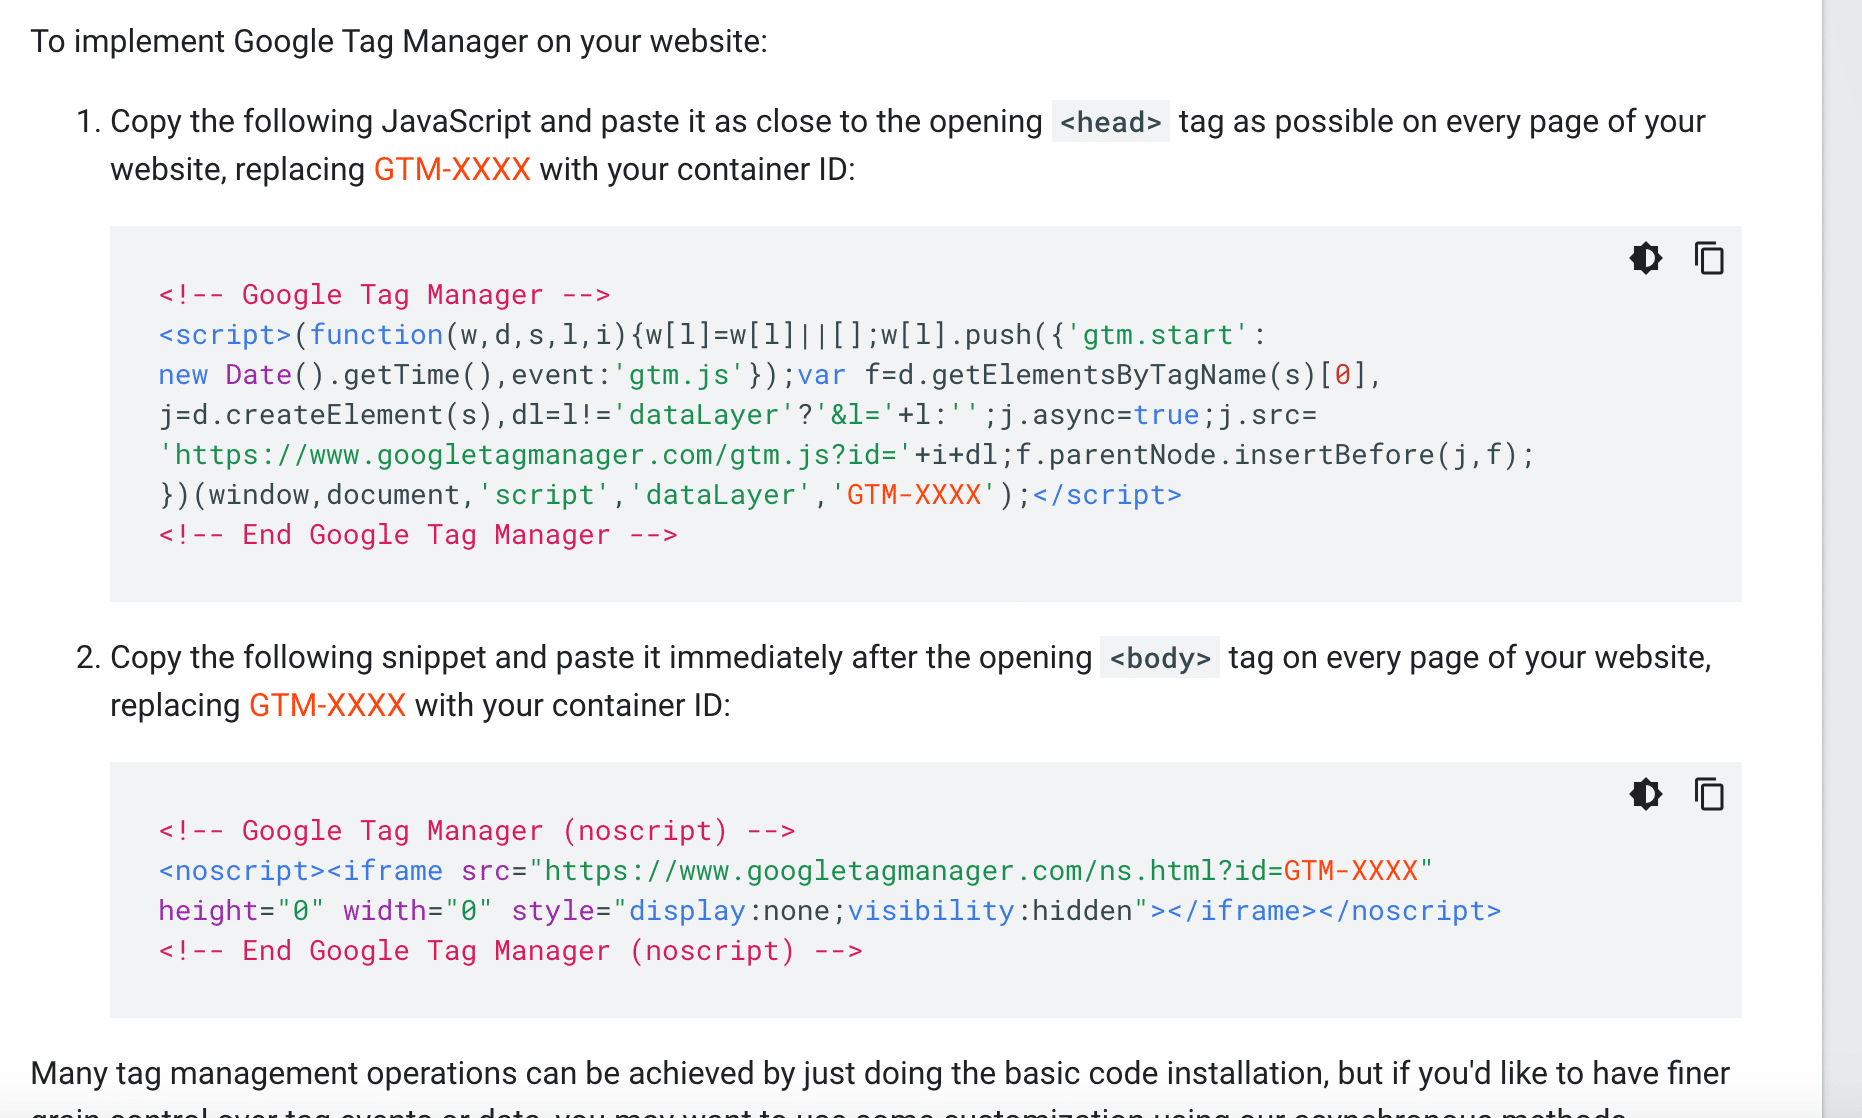
Once you’ve created a container and accepted the terms of service, you will be given two pieces of code that you need to add to your website pages, one in the header and one in the body.
These should be added to your website framework so that they can load on each page of your website. If you are using WordPress, for example, they can be added to the code for a WordPress theme.
The advantage of using Google Tag Manager is that once this is done, you shouldn’t have to ask for a developer’s help again.
Now you can start adding tags!
5. Four ways to get the most out of Google Tag Manager
Even if you don’t plan to do anything with Google Tag Manager just yet, it’s a good idea to install it as soon as you create a website or when you’re redesigning it. This can save you a lot of potential problems later on.
A great way to start is to install Google Tag Manager instead of Google Analytics, then add a Google Analytics tag to your container in Google Tag Manager.
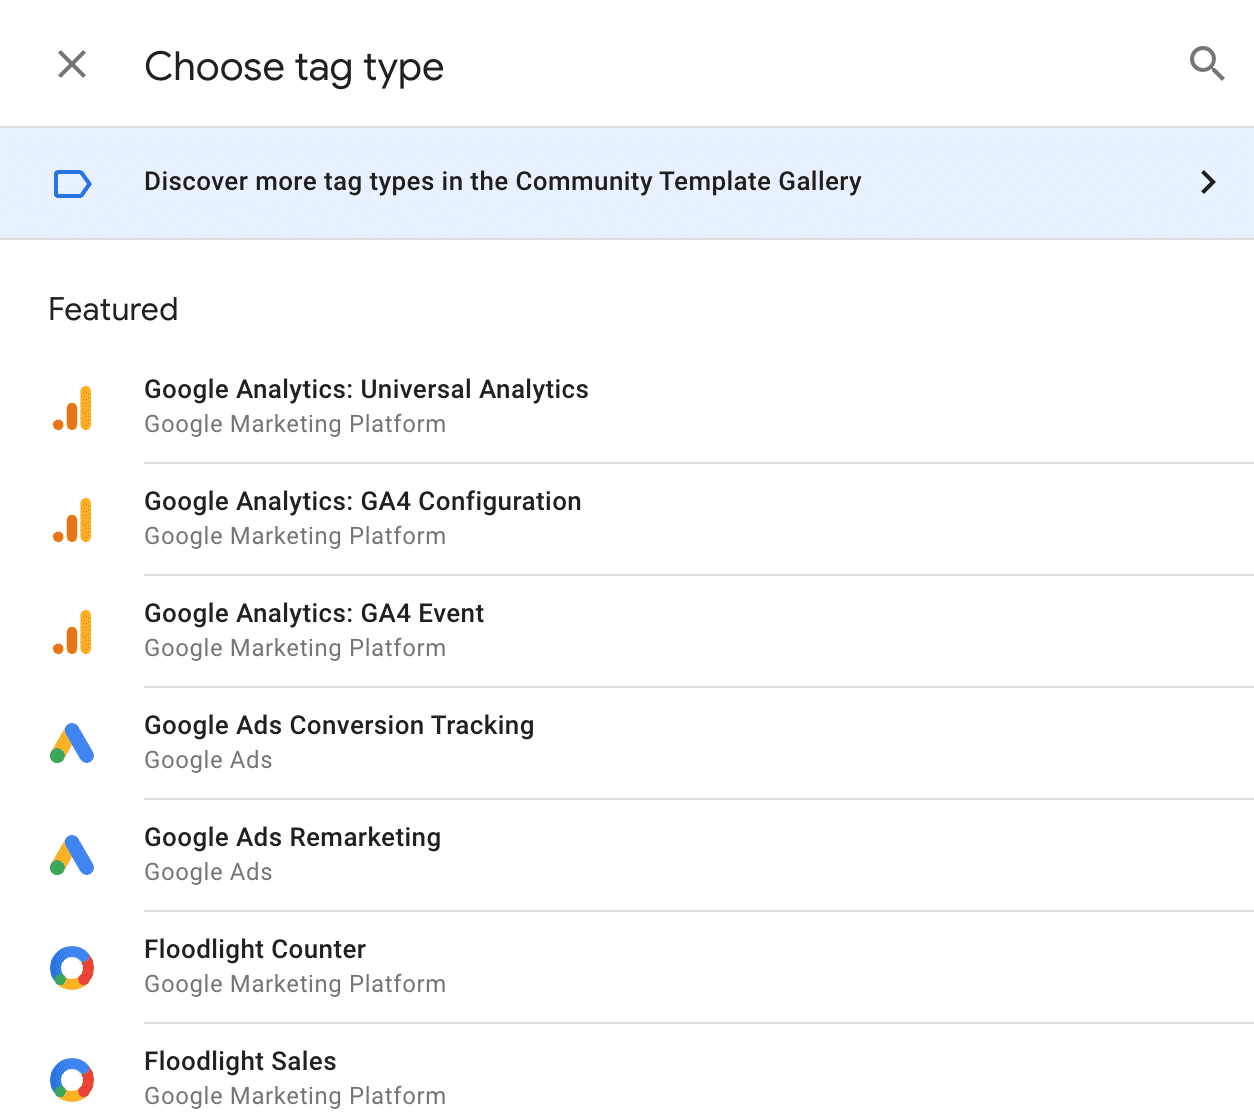
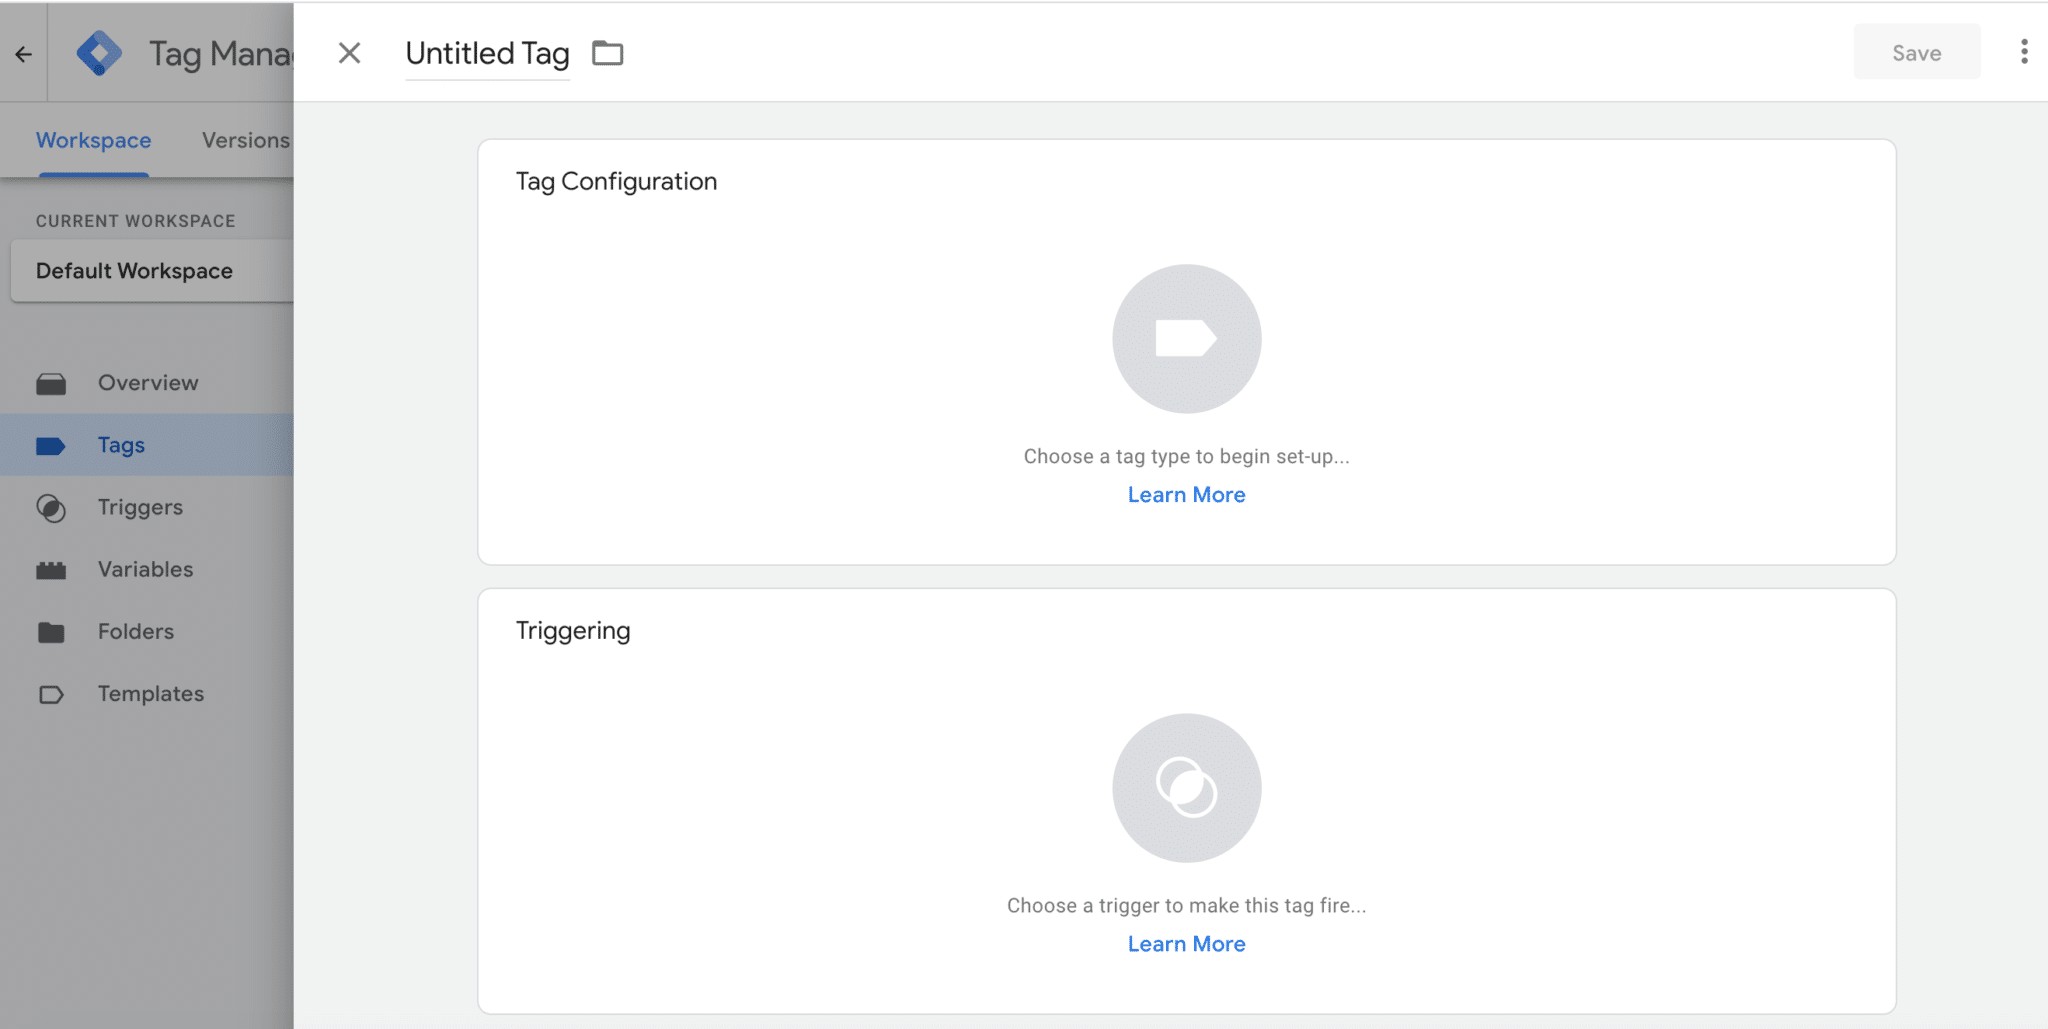
- Click “Add a new tag” on the Dashboard, or click “Tags” in the sidebar and then “New”:
- Give the tag a name and then click on the “Tag Configuration” box:
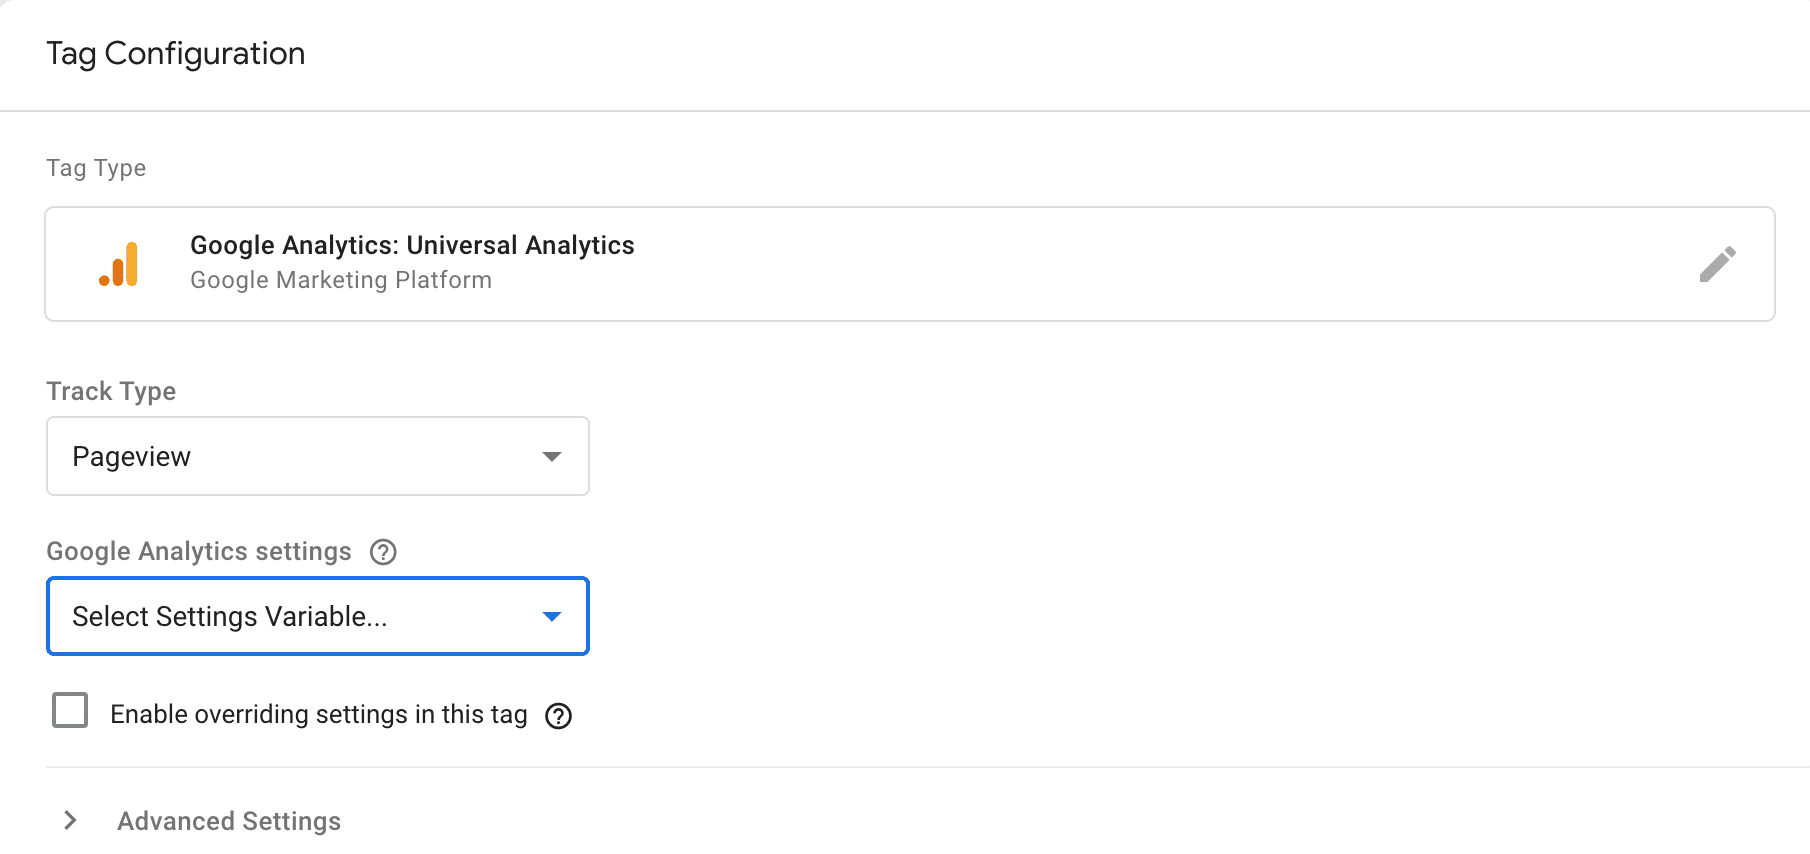
- Install both Universal Analytics (this is what we use at Plezi – it’s the most common version of the platform and if you’ve previously installed it, it was probably this one) and GA4 (the latest version of Google Analytics) in readiness for future developments at Google:
- Then for Universal Analytics, select “Page view” as the tag track type and create a new settings variable. Here you need to enter the tracking ID found in your Google Analytics account starting with UA-…
- Once saved, click the “Trigger” box and select the default “All Pages” trigger. All you need to do now is save it.
- Finally, you need to make sure that you publish the new version of your container if you want Google Analytics to work on your website.
All you have to do now is install Google Analytics 4 in readiness for future developments at Google. We advise you to install both of these analytics tags as soon as possible.
5.2 Use GTM to manage Google Analytics for multiple domains and multiple languages
Have you ever seen a URL that looks like this?
https://content.plezi.co/lemonway-tripled-inbound-marketing-leads-replay?_ga=2.33759329.1307836197.1623047449-1886262688.1585399996
The “?_ga-XXX“ part of this is actually a unique code that allows Google Analytics to track a visitor as they move from one of your websites to another.
If you use different website domains or subdomains for different languages for example, or use a different subdomain for each landing page, Google Analytics can get lost moving between them (Google Analytics 4 avoids this problem).
Here’s an example to illustrate this:
- A visitor clicks on one of your ads on LinkedIn
- They arrive on a landing page with a white paper and download this. Let’s say the URL of this landing page is “content.yoursite.com/landingpage”
- After download, they are redirected to a product page on your main website whose URL is “www.yoursite.com/productpage”.
- Google Analytics will indicate that this visitor comes from the “content.yoursite.com” URL, and that’s wrong. They come from an ad on LinkedIn.
To avoid having this problem, you need to:
- Go to Google Tag Manager, and under the Universal Analytics tag, click “More Settings”
- Then click “Cross Domain Tracking”
- Finally, add all the subdomains to be tracked, separated by a comma. For example, at Plezi, we have www.plezi.co, content.plezi.co, happy-academy.plezi.co, hackmypersonas.plezi.co.
5.3 Use Google Tag Manager for all ad campaign and marketing tool tags
In a CMS like WordPress, it’s often easy to use a plugin to quickly add a tag for a particular tool or a conversion tracking tag to your website. But the more plugins you have, the sooner these become difficult to manage and the greater the risk of slowing down your website.
By using Google Tag Manager to do this, you can retrace your steps at any time and better control how these tags are managed, making things much easier for the marketing team.
Google Tag Manager can greatly increase the efficiency of your marketing actions. It makes it easier for marketers to add tags to their website without needing to rely on developers to do this for them. This can help level the playing field for small businesses with limitedaccess to technical support.
Hopefully this introduction to Google Tag Manager will let you get started using it on your website. Don’t hesitate to leave us any comments!


